Campsite Cooking with Trails & Tap
Camping Food Adventures
Ever since we got our camper a few years ago, I’ve been enjoying the challenge of trying new camping foods.Growing up, when I would go camping at Hunting Island State Park in South Carolina, my grandmother Sylvia would leave the beach early, head back to her camper, and cook us these amazing camping dinners. My grandfather would help her out, sometimes grilling or almost always doing the dishes afterwards – he was a good sport about it!
As I’ve gotten older, I’ve become really inspired by my grandmother’s camper cooking skills. I’m nowhere near as talented a chef as she was, but I’m trying to channel her magic and bring it to my own campsite.
On our most recent camping trip to Fort Mountain, I made a few different meals that I think work really well for camping. In this article, I’ll share some of those recipes and a few hacks to make campsite cooking a little bit easier.
Campfire Nachos
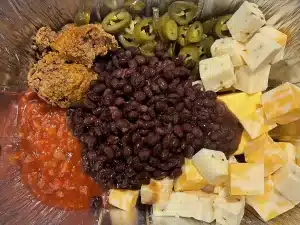
Campfire Nachos has become a staple for our camping trips. Originally, I saw this recipe on Pinterest. This is such an easy meal, and it makes so much food. We never finish it, but I’m sure it is the perfect amount for a group of four. I have tweaked it and personalized it to what we like. I also buy everything I can store brand – we like to save money!

Here is my short recipe for Campfire Nachos:
Ingredients and prep gear:
- 1 8 oz pepperjack cheese block
- 1 8 oz Monterey jack cheese block (or something comparable)
- 1 16 oz package of Velveeta (or similar melting cheese)
- 1 can of black beans – I get the seasoned ones
- 1 pack of taco seasoning
- 1 lb of ground turkey (or beef – it’s up to you!)
- 1 jar of your favorite salsa
- 1 jar of jalapenos (optional)
- 1 bag of tortilla chips
- 1 throw-away tin pan. I normally get the large rotisserie pans from Walmart – they are cheap and deep!
- Foil
Instructions – Night Before Camping:
- The night before you go camping, go ahead and cook your taco meat. Put the taco meat in a sandwich bag.
- Cut up your two cheese blocks (not the Velveeta) and put them in a gallon bag.
Of course, make sure these ingredients stay cold!
Instructions – When You Are Ready To Eat!
- Take out your tin pan and dump all of your ingredients into it. It’s that easy!
- Cover the throw-away pan with foil.
- Place over fire or grill. We always make a fire. Check your cheesy concoction after 15 minutes and stir it. Depending on how hot our fire is, it takes around 25-30 minutes to heat up. You know it is ready when all of the cheese is melted.
- Be careful, the dip will come out hot! Be prepared to be obsessed! This will be your new easy meal!
- When you are done eating, put all your trash in the gallon bag that you packed your cheese cubes in. All or most of it should fit!
Boil-in-Bag Breakfast Omelets

I have seen this several times on Pinterest and I was skeptical– can you really make an omelet in a bag? Honestly it sounds kind of gross. But after lots of research, I decided to give it a shot. If anything, we could have a few snacks for breakfast. Spoiler alert: it actually does work!
Ingredients and prep gear:
- Sandwich bags with decent zipper seals – not the kind that easily come apart. Double seal works.
- 2 eggs per omelet.
- Frozen vegetables that you would like in your omelet – we used frozen spinach, frozen bell peppers, and frozen onions.
- Shredded cheese of your choice.
- A pan to boil water in
Instructions – Night Before Camping:
- Crack 2 eggs in a bowl and whisk it together, just like you would make an omelet. If you put milk in your omelets/scrambled eggs, do it now.
- After your eggs are uniformly yellow, put them in a sandwich bag.
- Mix in the frozen vegetables you desire into your sandwich bag.
- Seal up the sandwich bag very tight and store it somewhere cold!
Instructions – When You Are Ready To Eat!
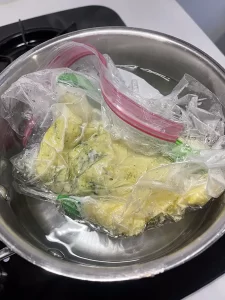
- In a pan, bring some water to boil. We use our stove top in our camper, but you can of course use a fire or hot plate for this.
- Once the water is boiling, place your omelets in the water.
- Let them boil for five minutes or so – you will see the eggs change from liquid to firm. It might take longer than five minutes, it really just depends on what you are cooking them on! Just keep an eye on your omelets.
- When they are finished boiling, take them out of the bag. To test if your eggs are cooked, open up the bag and carefully hold it upside down over a plate. If the eggs fall out mainly in one piece, it is cooked. If your eggs are runny, put it back in the bag and keep boiling for a minute or so longer.
- Enjoy!
Tip: Do not put your sandwich bags in a gallon bag when it is time to boil them. I was worried about my sandwich bags opening up in the boiling water, so I put them in a gallon bag and then put them all in the pan. This did not work, and the omelets did not cook. Once I took them out of the gallon bag and back into the boiling water on their own, they cooked correctly.
Other fun food tips for camping:
- Before we left for this trip, I had made a large cake, not thinking about our camping trip being in a few days. Not wanting the cake to go to waste, I got mini loaf tins to put the cake in. I topped them with foil and stored them in our fridge. This was perfect because it didn’t take up much space, the tins were super cheap, the tins could be thrown away, and it’s just fun having cake while camping!
- Make a dip! I made a cheesy corn dip for our trip. I don’t always want trail mix or crackers for a camp snack. If you’ve got the room in your fridge or cooler, why not mix it up a bit and make a dip!
- My absolute favorite camping meal I’ve ever had was when we went on a camping trip right after Thanksgiving. We took all of our leftovers with us and had an amazing second Thanksgiving meal outdoors!
- If you’ve got a microwave in your camper, take advantage of it and be creative! It’s crazy how much we use our microwave while camping.
- If you are going to buy disposable silverware, go to the party section of a store. The silverware is typically cheaper and comes in fun colors!
- Have fun with it! Don’t bring food that is too much work and is going to take away from your outdoors time.
If you’ve made it this far in this article, thank you! I know this isn’t they typical hiking and brewery combo, but a lot of hikers do a lot of camping! You never know when you’ll need a new food idea for your next camping trip.
Questions about my recipes? Ask in a comment below! Want to see what my campsite deliciousness look like? Check out the photos below!
Happy Trails,
Katie
This article is written in memory of my grandmother, Sylvia Dedels. She poured her heart into her cooking, whether it was at home or in her camper. Without her, I would not have known the possibilities and joys of camp cooking.


